Angry Birds Slingshot Controller
- Timothy Bukowski

- Mar 7, 2020
- 4 min read
Updated: Mar 13, 2023
March 2020
Overview
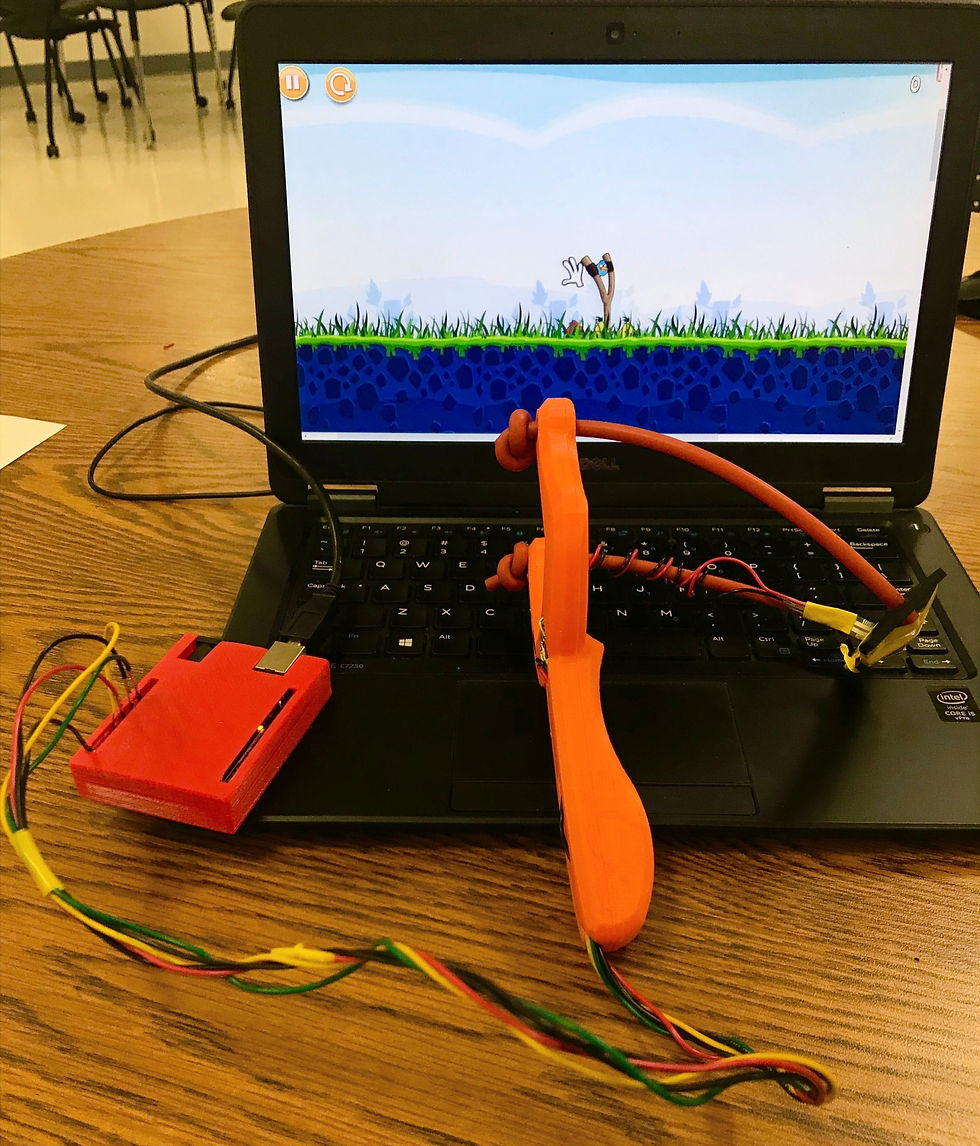
For this project I worked with a team of four to make a handheld controller for the Angry Birds video game. Angry Birds is a popular phone game, which is also available on the computer where you shoot birds from a slingshot to destroy structures. This game is normally played by pressing on the bird with the mouse cursor and pulling it back to aim and then releasing to let it shoot. We made a slingshot to control the game in a much more immersive, realistic, and fun way.
Objectives
Create a comfortable, realistic and fun controller
Become familiar with using Arduino uno and reading sensors through serial ports
Become familiar with pyautogui on python to interact with computer controls using sensor data
Design


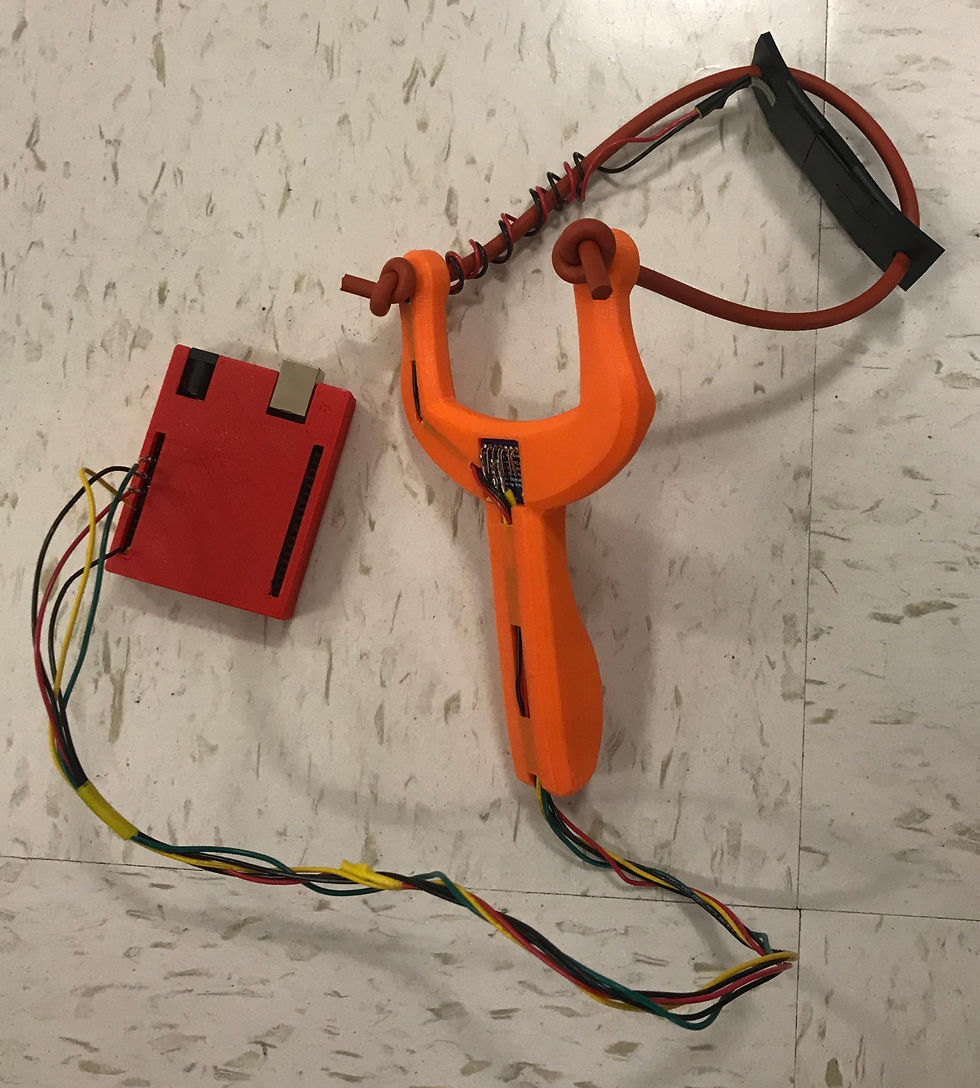
We knew from the start that we wanted to make the controller a slingshot, since that is what is used in the game. The biggest design decision we had to make was how to integrate the sensors. We wanted to try to hide all of the electronics and the multi-part design seemed like the best way to do that, however, we couldn't find a good way to design it in a way that would be easy to print, so we went with the external insertion design.
Sensors: Adafruit 3-axis accelerometer, Force Sensitive Resistor (Pressure sensor)
Software
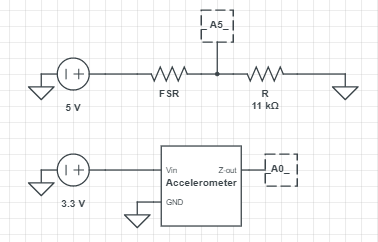
We used an arduino to read the voltages output by the two sensors, then had it send signals to my laptop, where the python code picked it up and performed the math to figure out the tilt and pullback of the slingshot. We found the python library pyautogui which allows you to access the mouse and keyboard, so using these functions we could interact with the game. However, we couldn't figure out how to drag and hold the mouse with pyautogui, so we found another library pynput which had a function to press and hold, while still allowing movement of the mouse.
Final Design


Construction
Printing


As seen in the second slide above, we initially tried to have all of the slots open with the idea to cover the wires with some sort of sleeve. We later changed this and added a cover to the slots to hold the wires in. We had trouble with the supports for the slots as well. They were difficult to remove, especially once we covered the slots. Luckily the slots were thin enough that the filament could bridge fine and supports weren't needed except in the hole for the accelerometer. For this we just built some thin walls into the CAD for the slingshot.
Assembly


During assembly we went through a few different options for the sling part of the slingshot. We initially wanted to have it stretch as a slingshot would, however, this made wiring the pressure sensor difficult. The wire was too stiff even even when we tried to coil it, it still was tearing the pressure sensor apart when pulled back, so we opted for a stiffer sling.
Final Product and Testing
A convenient and unplanned feature was that the slingshot could use the birds' power-ups by pressing the pressure sensor again when the bird is in flight.
Conclusion
The sling shot up working flawlessly, but in the future we could improve the code to make a more seamless experience. There is a photo recognition function on pyautogui which would allow us to press other buttons on the game such as next level or restart. In the future we would also improve the asthetics of the system, hiding all the wires and figure out a way to use a stretchy sling. I think I was successful in all my objectives for this project. I learned a lot about reading sensors with arduino and then interpreting that data through python and feel very comfortable with both.
Circuit and Code
Python Code
# Install the pyautogui and pyserial libraries
import serial
import time
import pyautogui
import math
from pynput.mouse import Button, Controller

mouse=Controller()

def xcoord(r,theta,x0):
    x=x0-r*math.cos(theta)
    return x
def ycoord(r,theta,y0):
    y=y0-r*math.sin(theta)
    return y

def mp(value, oldMin, oldMax, newMin, newMax): #mapping function
    oldSpan = oldMax - oldMin
    newSpan = newMax - newMin
    valueScaled = float(value - oldMin) / float(oldSpan) #slope of old
    return newMin + (valueScaled * newSpan)              #y=mx+b

#set range of sling in number of pixels
    #you can use FireRange code to calc rMax
rMin=0
rMax=60

theta = 0;
R = 0;
count = 0;

# Make sure the baudrate matches that of the Arduino
# Serial.begin(xxxx)
ArduinoSerial = serial.Serial(port='COM3', baudrate=9600)
ArduinoSerial.flushInput()
print('waiting for pressure to start......')
print('Press Ctrl c to end')

while 1:  #wait for pressure to be applied to start control
    try:
        ser_bytes = ArduinoSerial.readline()
        incoming = int(ser_bytes[0:len(ser_bytes)-2].decode("utf-8"))
        if incoming>1200:
            print('Lets get started')
            ser_bytes = ArduinoSerial.readline() #reset input reading to give r
            incoming = int(ser_bytes[0:len(ser_bytes)-2].decode("utf-8"))

            x0=pyautogui.position() #gives array of starting pos with cells x and y
    ##        print('initial position')
    ##        print(x0)
    ##        print('\n')

            mouse.press(Button.left)
            while 1:  #control loop - breaks when pressure is released
                ser_bytes = ArduinoSerial.readline()
                incoming = int(ser_bytes[0:len(ser_bytes)-2].decode("utf-8"))
    ##            print('i1 {}'.format(incoming))
                if incoming in range(200,1200):
                    mouse.release(Button.left)
                    break
                elif incoming > 1200:
                    r=mp(incoming,1200,2000,rMin,rMax)
    ##                print('r{}'.format(r))
    ##                print('t{}\n'.format(theta))
                    count+=1
                elif incoming < 200:
                    theta=(incoming-100)*math.pi/180
    ##                print('t{}\n'.format(theta))
    ##                print('r{}'.format(r))
                    count+=1
                x=xcoord(r,theta,x0.x)
                y=ycoord(r,theta,x0.y)
                pyautogui.moveTo(x,y) #move the mouse
    except:
        print('Thanks for playing')
        break
Arduino Code
int  zmin=268,zmax=400;
int x,y,z,r;
#define fsrpin A5
//Define variable to store sensor readings:
int fsrreading; //Variable to store FSR value

void setup() {
  Serial.begin(9600);
}

void loop() {
/////  Pressure Reading   /////////////////////////////
fsrreading = analogRead(fsrpin);
r=fsrreading+1000;         //Ofset data so it is between
                             //1000-2000 to make python program easier
 Serial.println(r);
/////   Angle Reading   ///////////////////////////////
z=analogRead(0);            //Only need angle with z axis
z=map(z,zmin,zmax,0,180);
Serial.println(z);
delay(250); //Delay 500 ms.
}


Comments